


Description
Objective
-
To generate sodium acetate, sometimes known as hot ice, combine baking soda and vinegar. When you pour it, it immediately crystallises, enabling you to build a tower of crystals. Since crystallisation is an exothermic process, the resulting “ice” will be warm to the touch. Science is amazing!
Materials
- White vinegar, 4 cups (acetic acid)
Baking soda, 4 teaspoons (sodium bicarbonate)
A pot
A mason jar or glass measuring cup (be sure the glass is heat-safe)
A dish
a fork
Procedures.
-
- 1st step: In a pot, mix 4 cups of vinegar and 4 tablespoons of baking soda. I perused several websites for hot ice directions before we conducted this experiment. I made the decision to use the amounts specified in Plato’s Playdough. Adding the baking soda gradually will prevent it from bubbling all the way to the borders of your pot when it fizzles.
- Step 2: The sodium acetate you made has been made! (Along with carbon dioxide, which was released throughout the reaction and caused all of the fizzing.) However, to lower the water content to a level where crystals can form, you must boil the solution.
For about an hour, simmer your solution over low to medium heat. You want to reduce it to no more than 1 cup.
Now, according to what I read online, crystals would begin to form around the pan’s edge. This is significant because the crystallisation process requires a small number of crystals to act as “seeds.” Well, during the cooking process, our solution never crystallised. I eventually came to an end when I was down to 3/4 cup.
- Step 3: Transfer your sodium acetate to a glass jar and chill it for 30 to 45 minutes.
We did this, and I scraped some of the dried solution off the sides of the pot in the hopes that it would act as the crystals necessary to initiate the reaction while it was in the refrigerator.
It didn’t succeed. Boo. The pan scrapings were covered with the solution, but nothing happened.
We made an attempt to refrigerate it for a while longer. Nothing as of yet.
However, this experiment is very tolerant! I put the answer on the counter and went back to it the following day. Perhaps it wasn’t enough concentrated, so I chose to boil it a little longer. Furthermore, we had never seen any crystals.
This test, however, is quite lenient! The next day, I went back to the problem after leaving the solution on the counter. Maybe it wasn’t concentrated enough, so I chose to boil it a little longer. Furthermore, we had never witnessed any crystals forming in the pan. The solution had been reduced so much that we had to stop after about 10 more minutes of boiling even though there were no crystals forming on the pan’s rims.
The residual liquid in the bottom of the pan immediately crystallised as soon as I emptied the solution out of the pan and into a glass jar! so I was aware that we were making progress.
- This time, I froze the solution for roughly 20 minutes. Much quicker.
Step 4 is to pour the cooled solution over some of the crystals you removed from the pan.
I removed a few crystals off the pan’s bottom and placed them in a plastic tray.
- It took a moment for the first tiny bit to crystallise. but it DIDN’T!
He continued to pour, a bit at a time…
The crystals will spread out horizontally if you pour too quickly. So we moved very slowly.Watching it was so much fun! By the time he was finished, Aidan was only adding a drop at a time, and we could see each one accumulate on top of the tower of hot ice.
What’s Going On?
Water is present in the sodium acetate solution. Although we boiled the solution to remove some of the water, water is still present. The sodium acetate doesn’t crystallise because of the water molecules. Crystals might begin to form, but as soon as a few molecules combine, the water molecules tear them apart once more.
We were able to lower the sodium acetate’s temperature during the cooling process, below the threshold at which it would ordinarily solidify. This is referred to as being supercooled.
By the way, although we typically associate melting and freezing points with water, all substances have one. For instance, until it reaches 1,984 degrees Fahrenheit, copper is still a solid.
Now, regarding the sodium acetate The nucleation site, which the crystals in the tray served as, allowed crystals to form in the solution. The sodium acetate now had the push it required to crystallise!
According to the instructions on Instructables, filter the solution to remove any contaminants that can prevent crystallisation. We skipped that step, and everything worked out just fine.
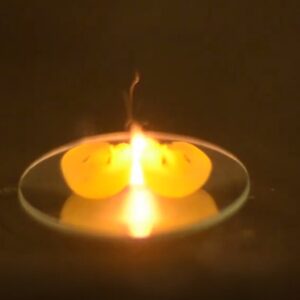
The heated ice is warm to the touch because of the heat produced by the crystallisation process. But it’s not hot enough to burn. Each of us enjoyed touching it.
Even though our structure was somewhat fragile and cracked easily, we enjoyed carrying out this science experiment. You can remelt the crystals into a liquid, chill it again, and build another tower if you want to repeat the procedure.
I was a little concerned about our pot as well, but it was very simple to clean. The sodium acetate is simple to dissolve and immediately rinses off.
Take pleasure in science!
Disclaimer and Safety Precautions
Warning is hereby given that not all Project Ideas are appropriate for all individuals or in all circumstances. Implementation of any Science Project Idea should be undertaken only in appropriate settings and with appropriate parental or other supervision. Reading and following the safety precautions of all materials used in a project is the sole responsibility of each individual. For further information, consult your state’s handbook of Science Safety.
Safety
- Put on protective eyewear. Conduct the experiment on the plastic tray and in a well-ventilated area.
- Keep a bowl of water nearby during the experiment.
- Keep flammable materials and hair away from flame.
- Avoid looking directly at burning magnesium to prevent eye discomfort.
- Do not attempt to extinguish the solid fuel and magnesium — let them burn down completely. Do not touch the stove after the experiment — wait until it cools down.
- Do not allow chemicals to come into contact with the eyes or mouth.
- Keep young children, animals and those not wearing eye protection away from the experimental area.
- Store this experimental set out of reach of children under 12 years of age.
- Clean all equipment after use.
- Make sure that all containers are fully closed and properly stored after use.
- Ensure that all empty containers are disposed of properly.
- Do not use any equipment which has not been supplied with the set or recommended in the instructions for use.
- Do not replace foodstuffs in original container. Dispose of immediately.
- In case of eye contact: Wash out eye with plenty of water, holding eye open if necessary. Seek immediate medical advice.
- If swallowed: Wash out mouth with water, drink some fresh water. Do not induce vomiting. Seek immediate medical advice.
- In case of inhalation: Remove person to fresh air.
- In case of skin contact and burns: Wash affected area with plenty of water for at least 10 minutes.
- In case of doubt, seek medical advice without delay. Take the chemical and its container with you.
- In case of injury always seek medical advice.
- The incorrect use of chemicals can cause injury and damage to health. Only carry out those experiments which are listed in the instructions.
- This experimental set is for use only by children over 12 years.
- Because children’s abilities vary so much, even within age groups, supervising adults should exercise discretion as to which experiments are suitable and safe for them. The instructions should enable supervisors to assess any experiment to establish its suitability for a particular child.
- The supervising adult should discuss the warnings and safety information with the child or children before commencing the experiments. Particular attention should be paid to the safe handling of acids, alkalis and flammable liquids.
- The area surrounding the experiment should be kept clear of any obstructions and away from the storage of food. It should be well lit and ventilated and close to a water supply. A solid table with a heat resistant top should be provided
- Substances in non-reclosable packaging should be used up (completely) during the course of one experiment, i.e. after opening the package.
Disposal
Dispose of the reagents and solid waste together with household garbage.
Reviews
There are no reviews yet.